Smoke still life: The Photography News Podcast #3
Posted on Apr 29, 2020
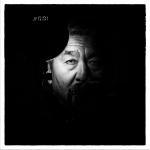
Incense sticks probably aren’t the first object you’d think about when it comes to creating a still life but, as we discussed on episode three of The Photography News Podcast, they have hidden talents. I didn’t want to photograph the stick itself, of course, more the smoke it emits.
My set-up to achieve this was simple. Two large pieces of white card taped together into an L shape with a black background draped over the piece behind my incense stick and window light on one side. I shot on an overcast day to avoid any shadows. I tripod-mounted my camera to keep it fixed in one place and shot with a macro lens. A standard zoom will work perfectly well.
Once the incense stick was lit, I shot using the manual mode, an exposure of 1/125sec at f/2.8 and ISO 1600. I switched between AF and manual focus – both gave me perfectly decent results – but did use continuous shooting as the smoke patterns change so quickly. If you’re using AF, be prepared to move the focusing point around to where the best patterns are. You may need to encourage some smoke movement by wafting your hands, but it responds to the slightest draught or movement so interesting patterns shouldn’t take too long to appear.
Click the images to see a larger view


I shot for the time it took the incense stick to burn through – approx 20 minutes – and then headed to my computer. The SOOC files are nice enough, but I took them into Photoshop to play a little more.
1) I started by going to Image > Adjustments > Curves and inverted the image by moving the diagonal line from bottom left/top right to top left/bottom right.
2) Next, I went to Image > Adjustments > Levels, taking the sliders in on the right and left sides of the histogram to bring the whites up and darken the blacks.
3) Now, I chose Image > Adjustments for a third time and selected Hue/Saturation. You can fiddle with the three sliders to your heart’s content. I made all my changes using the Hue and Saturation sliders, dialling in -89 Hue and +10 Saturation to get what you see here.
4) To add the black border, I chose Select > All and then went to Edit > Stroke to bring up the Stroke pane. I gave my Stroke a width of 100px, made it black and ensured the Inside option was selected under Location.
5) Finally, I added a second white border by choosing Image > Canvas Size and changing from Centimetres to Percent in the New Size area, then typing 120 into both the Height and Width and finally making sure the Canvas extension colour was White.
6) The final image.
Click the images to see a larger view

Step one

Step two

Step three

Step four

Step five

Step six
Have you listened to The Photography News Podcast yet? You can listen on YouTube, Spotify and Apple Podcasts, and it’s packed with techniques and advice.
Get in touch for a chance to have your question or story featured by emailing [email protected]
Don’t forget to sign up to receive our newsletter below, and get notified about the new issue, exclusive offers and competitions.